Table of Contents
Information
How to Conform Closed Captioning for Netflix
By: Nathaniel Deshpande
Last Updated: July 30, 2023

TL/DR
- Closed caption conform is the process of taking existing captions and editing them to meet the style guidelines (or requirements) of a specific platform (e.g. Netflix)
- Netflix standards are available on their partner website (see Resources section)
- Netflix has strict guidelines for style and timing
- Closed Caption Creator can help conform closed captioning for Netflix using custom style guides, and automatic correction.
Introduction
Broadcasters today are delivering more content to more destinations than ever before. This sometimes requires taking closed captioning and subtitles created for one platform and conforming them for another.
In this article we'll explore the process of conforming closed captioning based on the Netflix style guidelines. We'll also show you how Closed Caption Creator makes it easy to adjust timing and formatting to meet Netflix requirements.
What is Closed Caption Conform?
Closed caption conform is the process of taking existing captions and editing them to match the style guide or standard of a specific platform. For example, when creating closed captioning for YouTube there may be a limited number of requirements that captions must meet. For platforms like Netflix, they require captions follow strict guidelines and standards.
You can find a complete list of Netflix style guides on their partner website.
Netflix Standards
Before starting the conform process it is important to review the style guidelines and standards that apply. For Netflix, you should review the Subtitle Timing Guidelines, and the Timed Text Style Guidelines (based on your media source language).
Style Guidelines
Style guidelines cover the text content of your closed captioning or subtitles. Netflix requires captioners to include as much of the original content as possible, and not to simplify or 'water down the original dialogue". This part of the guide seems pretty standard, and commonsense for experienced captioners.
The part where it gets interesting is where it starts to discuss the technical requirements such as the maximum number of characters per line (42), and the formatting of entities such as dates, numbers, and abbreviations.
There are also standards for how multiple speakers should be identified, and when it is appropriate to italicize text.
The style guidelines also touch on reading speed (or rate) which will impact timing. Reading speed is measured in number of characters per second (CPS). For English subtitles, the reading speed can be up to 20 characters per second for adult content, or 17 characters per second for children's content.
Timing Guidelines
Timing guidelines apply to the timing and sync of your closed captioning or subtitles. The basic requirements are quite simple: subtitles and closed captioning should be in sync with the audio and video (obviously).
The difficult part is that Netflix requires timing should also match shot changes. This helps improve presentation for the end-user. Lucky for us, Closed Caption Creator makes this easy by allowing users to detect shot changes, and then sync subtitle timing to shot changes automatically.
Subtitles within 11 frames of a shot change should be synced to that shot change.
And if things weren't complicated enough, there is also a minimum frame gap of 2 frames between chained events. This means that subtitle events should always have at least 2 frames between the end of one event and the start of the next event.
Again, Closed Caption Creator can help by inserting these frame gaps automatically.
Conform Process
In this section we'll actually walk through the process of conforming closed captioning for Netflix. This is my own process, based on my experience of what works best for deliveries. You may find there is a better way that works for you, but this generally what I recommend.
Step 0: Import & Prep
Before starting the conform process I like to import the original closed caption file and check the original timing and content against the video I've been provided. There have been a couple times when I receive a broadcast caption file that was segmented and no longer matches the video source.
There are also times when I need to convert the closed caption style from Roll-Up or Paint-On to Pop-On captions. This can easily be done in most professional closed caption software through one of the menu options.

The final check I like to make is ensuring the project incode matches the burnt-in timecode of the video especially for broadcast files that often have a 1 hour or 10 hour offset. If your video does not have burnt-in timecode you can skip this step.
Step 1: Identify Errors
The easiest way to identify any errors is to set up a custom Style Guide in Closed Caption Creator by going to Edit -> Options -> Style Guides.
Style Guides are a set of rules that make it easy to identify issues and apply automatic corrections.
In our video on QC & Review we walk you through setting up a new Style Guide and detecting errors using the QC & Review panel.
Step 2: Review & Categorize Errors
Once you have identified the events that need to be edited, you can begin to review each error and determine how much work is involved to conform your project.
I like to classify my errors based on three types: Timing Errors, Format Errors, and Content Errors.

Timing and Format errors can be fixed automatically using the tools available in Closed Caption Creator. Content errors like abbreviations, date formatting, etc. require manual correction.
Step 3: Correct Content Errors
Start by correcting the content errors found in the QC & Review panel.
These will appear as errors for content such as numbers that should be spelt out instead of written (e.g. 1 should be one). Or you may need to remove the dots in acronyms (e.g. U.N.I.C.E.F should be UNICEF).
The Text Formatting menu in Closed Caption Creator (Format -> Text) can help automatically fix some of these errors, but may not be able to correct everything (i.e. removing periods from acronyms).

You may find that fixing these issues will introduce new issues. It is important to re-run the QC & Review checks multiple times to check if new errors have been introduced.
Step 4: Correct Format Errors
The next set of errors I like to correct are the format errors. These are events with too many lines, or too many characters in a line.
The easiest way to do this is using the Auto Format tool in Closed Caption Creator.
The Auto Format tool allows you to set the maximum number of lines and characters then correct any Events that exceed these two settings.
The Auto Format tool will split events when required and adjust for time where possible. This ensures new events are on screen for the set minimum duration.
In this video we walkthrough the process used to automatically format events to meet line length, and character length requirements.
The Auto Format tool can be used to automatically fix subtitle events where the number of lines or characters exceeds the set amount
Step 5: Correct Timing Errors
Finally, the last set of errors will be timing errors. These are errors related to shot changes, frame gaps, and reading speed (rate).
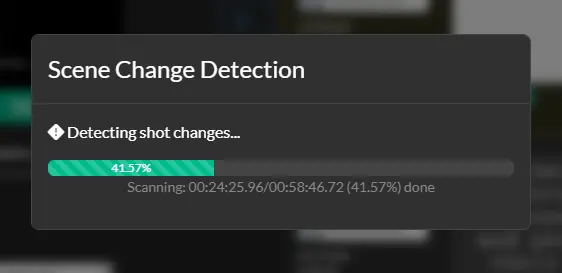
In order to ensure subtitles start and end on shot changes we'll need to identify all shot changes in our video. To do this we can go to Ai Tools -> Detect Scene Changes.

Now that we know where all the shot changes are located, we can go to the format menu and select Snap to Scene Changes.
All event times should now start/end on a shot change where appropriate.
We can now correct for any reading rate errors by going to the Timecode menu and select Auto Correct Timing. The Auto Correct Timing tool is designed to automatically conform subtitles to a maximum reading speed measured in CPS.
The Auto Correct Timing tool will adjust the timing of events to meet the maximum reading speed, and duration values set.
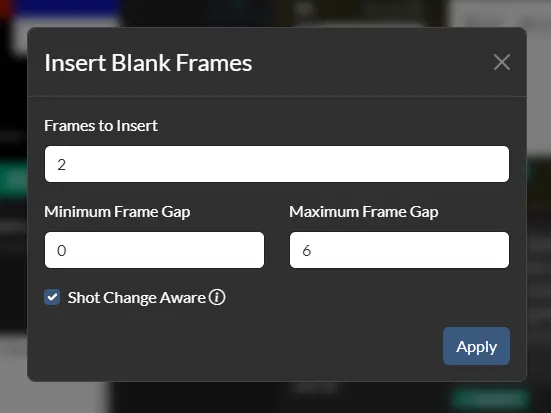
The next step is to insert the correct number of frames between events. To do this we open the Insert Blank Frames panel by going to Insert -> Insert Blank Frames.

You will want to ensure the Shot Change Aware checkbox is enabled so that blank frames are correctly inserted around shot changes.
The Insert Blank Frames panel will automatically insert a gap between chained events based on the minimum and maximum frame gap.
Step 6: Final Review & Export
The very last step is to review all of the automated changes that were made using the QC & Review panel (see step 2 above). There are usually a few errors remaining that require manual intervention.

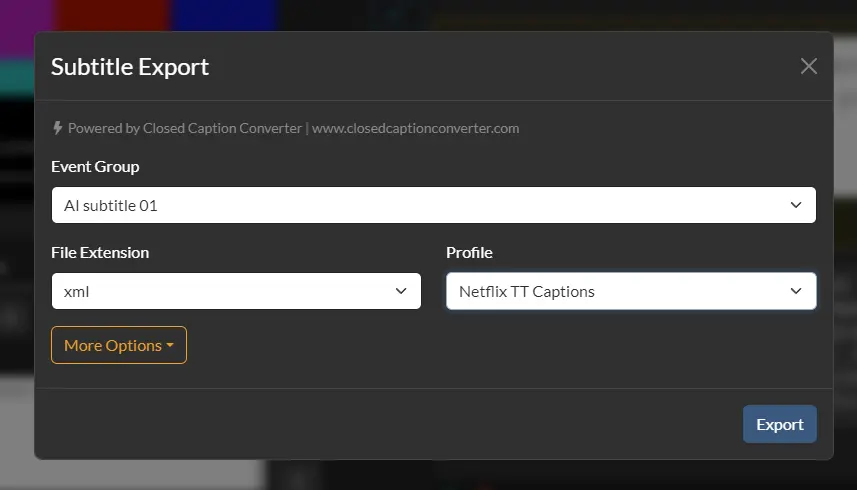
You can then export your work in one of the many custom Netflix caption formats we support. The most popular option is the Netflix Timed-Text Captions profile. This will generate Netflix compatible caption file that can be delivered directly to the platform.
Conclusion
Conforming closed captioning to meet new style guidelines can be as much work as creating captions from scratch. In this article we discussed what closed caption conform is, and walked through the process of conforming captions based on the Netflix style guidelines.
We were able to see that this is not an easy process, nor is very straightforward. It requires both manual and automated tools in order to satisfy the requirements.
Feel free to share this article with your manager or team lead so that they can get an idea of the process for themselves. Closed caption conform can feel like a balancing act where changing one setting impacts the timing of every other event.
If you regularly work with closed captioning and need a professional editor to help make your life a lot easier, I recommend signing up for a free trial of Closed Caption Creator or exploring our website to learn more about the different solutions we have to offer.